Halloween spending is expected to reach $9 million this year. The holiday has become wildly popular in the United States, which accounts for rise in spending. Most people with dogs like to include their pet in their Halloween plans and dress them up. One of the ways to trim the overall cost of your celebration is making your own spooky garb. Check out the DIY dog costumes below! They are to-die-for!
DIY Dog Costumes Anyone Can Make
Thinking about DIY anything can be a little nerve-wracking for some people. What’s doable for one person may not be doable for someone else. However, each of these DIY dog costumes is super easy to make and can be pulled off by almost anyone! Not to mention, they’ll save you a TON on your pup’s Halloween get-up.
Martini Dog
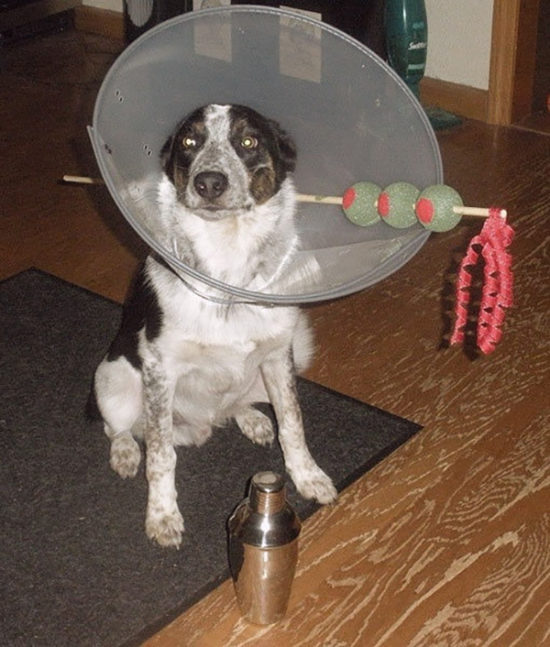
Items you’ll need to have on hand for this DIY costume are fairly minimal. You’ll need an e-collar (aka the cone of shame), a red ribbon, thin stick or cardboard, red felt, hot glue, and styrofoam balls. Once you’ve got those items on hand, follow the steps below to create this look.
- Take the stick and put it through the green styrofoam balls.
- Hot glue the red felt to the styrofoam to create the appearance of an olive.
- “Garnish” the stick with red ribbon.
- After completing the steps above, stick the olive stick through one of the holes in the cone and put it on your pup.
Photo: Homes Alive Pets
Butterfly
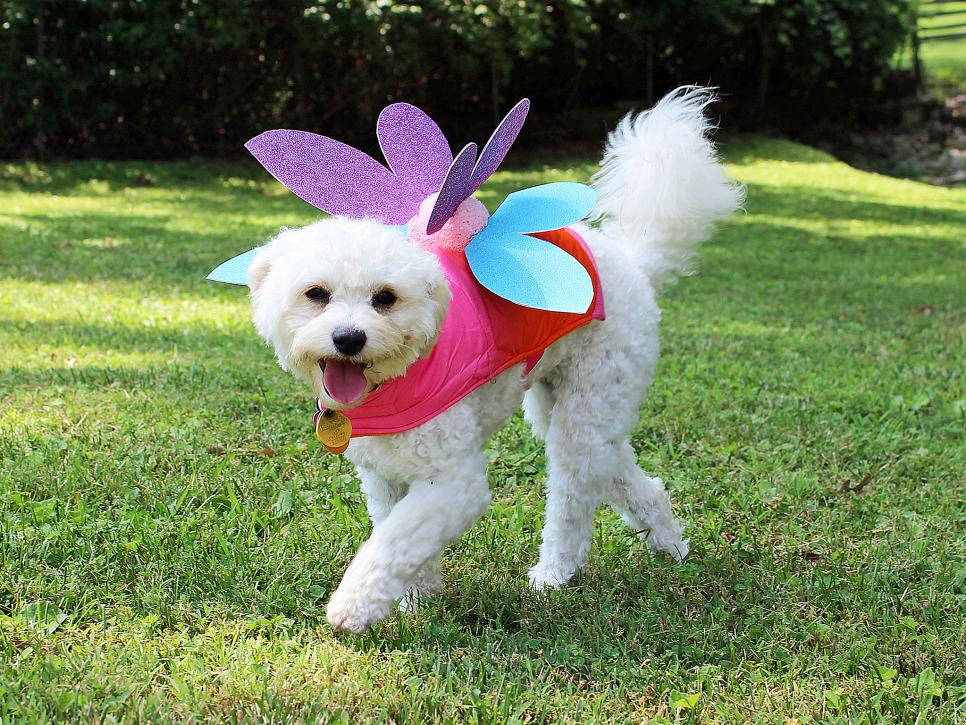
You’ll need some extra craft items to pull off this look, along with a piece of your dog’s clothing you don’t mind altering. Here’s how to re-create this adorable butterfly look step-by-step.
- Create a template for the wings by sketching the shape onto scrap paper.
- Cut out the template and then trace two wings on the back of each piece of cardstock.
- Next, cut out the wings (you’ll have four total).
- Glue the wings together.
- Using a knife, cut the foam sphere in half and paint it with pink craft paint (or your color of choice).
- After the paint has dried, coat with spray adhesive and (after it has dried) and sprinkle on glitter.
- Cut two slits in the sphere (spaced evenly apart) and slide wings into the slits. They should fit tightly into the foam.
- Near the bottom of the sphere, cut two more slits and insert the other pair of wings.
- Pick out the piece of clothing you plan to attach the wings and place the clothing on your pet to determine where the wings should be placed.
- Mark the placement and take the clothing off your dog to attach the wings with a hot glue gun.
Photo: H. Camille Smith
Ghost
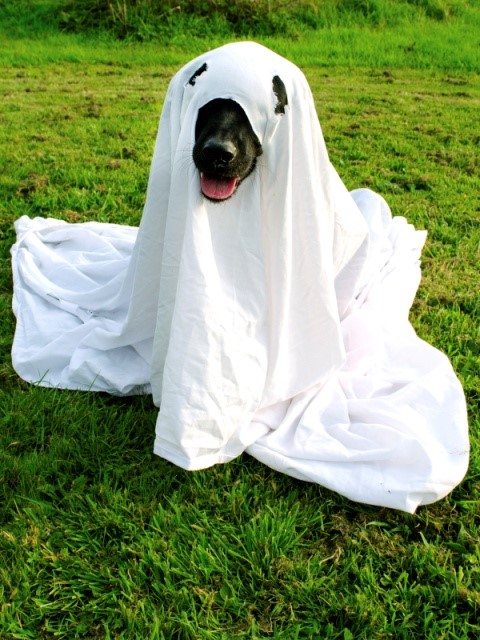
Ghost costumes are pretty common, however, dressing your dog up as one is a cheap and easy way to get your pup in the Halloween spirit. Just cut holes for your pet’s eyes and mouth in a white sheet and trim the sheet so your pet isn’t tripping over it. This is quick and easy to get done and is a hit!
Photo: iStock
Angel or Devil?
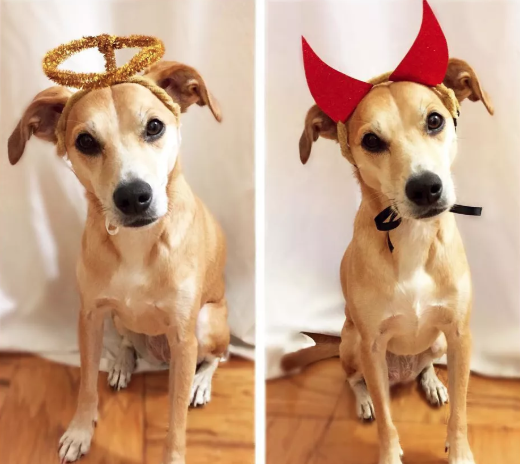
What you’ll need to pull off the angel or devil look for your dog this Halloween is felt, ribbon, pipe cleaners, and hot glue. Craft the pipe cleaners into the horns or halo, depending on what look you’re going for. Use the hot glue to attach felt in the desired shape.
Photo: Instagram @dcdogmoms
Beanie Baby Costume
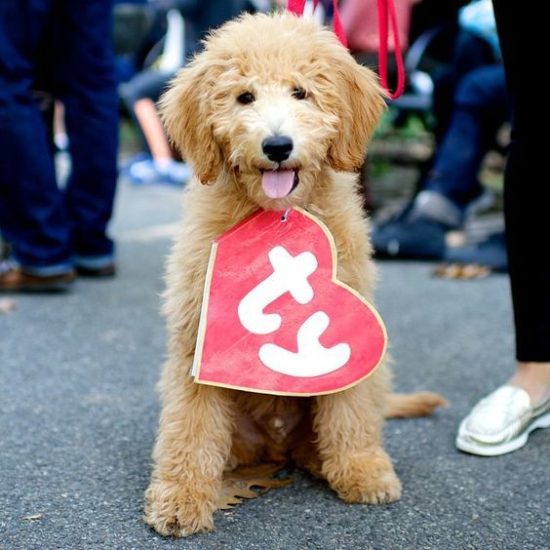
Many people have adopted this adorable DIY costumes for their pets in recent years. All you’ll need is paper, scissors, mod podge, a hole punch, and red ribbon. Then, follow the steps below to complete your pup’s costume.
- Trace the shape of a Ty beanie baby tag.
- Then cut the heart shape out and punch a hole in the paper.
- Draw the Ty design on the front of the heart shape.
- Tie the “tag” around your dog’s neck with a red ribbon like you would a bandana.
Photo via Pinterest
These are just a few of the cutest DIY dog costumes out there. If you have a DIY idea to add to the list, send us a photo of your pup and the instructions and we’ll add it to the list.
Read More
- 10 Things to Buy on Amazon If You Love Halloween
- Be Your Own Handy (Wo)Man With a DIY Tool Kit
- How to Practice Self-Care on a Budget
- Reuse and Recycle Around the Home to Save Money
- Should You Microchip Your Pet?